Partikkel Cloud Designer
Oeyvind Brandtsegg, 2007
obrandts@gmail.com
Selecting an audio output device
Using Partikkel Cloud Designer
Description of the different parameter types
Partikkel Cloud Designer is a python gui for composing 4-voice audio particle clouds.
A "cloud" is technically a collection of parameter automations for 4 simultaneous partikkel generators in csound.
You could think of a cloud as an "audio gesture", where the shape of the gesture is contained in a preset automation, but the contents and general attitude of the gesture can be changed while the gesture is played back.
One cloud may contain over 300 parameter values, and clouds may be modified in realtime by means of metaparameters during playback.
Clouds can be imported to ImproSculpt4's cloudPlayer module.
Selecting an audio output device
The csound commandline parameters can be found in the file csoundCommandLine.py,
this is the only part of the code that you probably will have to edit.
For details on the csound command line parameters, refer to the csound manual.
To run
Run the file main.py
To quit:
Close the Cloud Play Controls window or select “Exit” in the File menu of the window.
Using Partikkel Cloud Designer
The GUI is split into two windows: Cloud Play Controls and Cloud Preset Controls.
The cloud preset controls window contains detailed parameter settings for a cloud.
The cloud play controls window is used to play back clouds and to control the metaparameters for realtime cloud modification. You can also create sequences of several clouds linked together in this window.
Getting started
As the application involves a large number of parameter, and it might be daunting for the new user, what follows is a simple way to start getting sound out of the application. Hopefully, the user will be encouraged to experiment by modifying this first sound.
1: In the Cloud Play Controls window, go to the File menu and select “Open single cloud preset”. In the dialog that follows, choose one of the cloud presets available, for example “cloud2.clo”.
2: Press the button “Play single”, and you should hear the cloud being played.
Cloud Play Controls
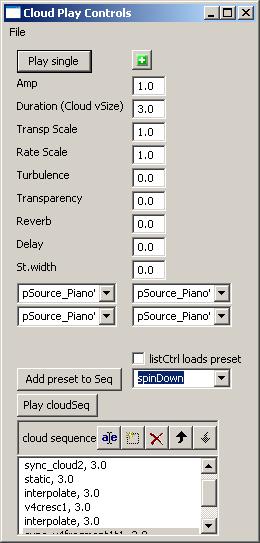
The play controls GUI window
Play single
Starts playback of the currently loaded cloud preset
‘+’
Opens the Cloud Controls window (if it’s been closed), brings the window to front if it’s been hidden.
Amp
Sets the master amplitude for cloud playback.
Duration
Sets the duration for playback of the currently loaded cloud. Also sets the duration when adding a cloud preset to the cloud sequence, using the Add preset to Seq control.
Metaparameter, scaling the transposition values for all generators in a cloud
Rate Scale
Metaparameter, scaling the grain rate values for all generators in a cloud.
Turbulence
Metaparameter, scaling all random variations to the cloud parameter automation. In addition to modifying the random deviation values, it also modifies rMask and grDist parameters. Range 0.0 to 2.0. The control behaves differently when the value is in range 0.0 to 1.0 than what it does when the value larger than 1.0.
When the value is in range 0.0 to 1.0, it scales the parameter (random deviation, rMask or grDist) value. When the value is larger than 1.0, it adds offset to the parameter value. For random deviation parameters, the offset formula is value+(Turbulence-1), for rMask and grDist the offset formula is value+((Turbulence-1)*0.2).
Transparency
Metaparameter, controlling the general density of the cloud timbre. This is done by mapping transparency to the parameters grain rate, grain duration and rMask.
Range -1.0 to 1.0. The transparency mapping formula for grain rate is value‑(value*Transparency*0.8), for grain duration it is value‑(value*Transparency*0.98), and for rMask it is value+(Transparency*0.4).
Reverb
Sets the amount of reverb effect send for partikkel audio channel 4. Range 0.0 to 1.0.
Delay
Sets the amount of delay effect send for partikkel audio channel 3. Range 0.0 to 1.0.
St.width
Sets the stereo spread for partikkel audio channels. Range 0.0 to 1.0. When the St.width value is 0.0 all audio outputs from the partikkel generators will be routed with equal amplitude to stereo audio out left and right. When the value is 1.0, partikkel audio channel 1 and 3 will be hard panned left, while channels 2 and 4 will be hard panned right.
Waveform menu controls
Select the audio files used as source waveforms for grains. The partikkel generators use four source waveforms and there’s one drop-down menu for each. The contents of these menus are automatically updated to include all audio files in the /samples directory when the application starts. The graphical position of these drop-down menu controls correspond to the setup used for wave mix. Like this:
Waveform1 Waveform2
Waveform3 Waveform4
Cloud preset menu
This drop-down menu control contains all previously stored cloud presets, automatically updated to include all cloud preset files (*.clo) in the /presets directory when the application starts. It can be used to load presets into memory (if the listCtrl loads preset checkbox is enabled), and to add presets to a sequence (by using the Add preset to Seq control).
listCtrl loads preset
When this checkbox is enabled, presets will be loaded into memory when selected in the Cloud preset menu. In this manner, it enables the Cloud preset menu to act as a shortcut for “Open Single Cloud Preset” (Ctrl+O) on the File menu.
Add preset to Seq
This button is used to add the currently displayed preset (in the Cloud preset menu) to the cloud sequence. The duration as specified with the duration control will be used as duration for the preset in the sequence.
Play cloudSeq
Starts playback of the current cloud sequence, as specified in the cloud sequence list.
Cloud sequence
This is a list of cloud presets for sequenced playback. The list has the following format: cloudName, duration. The cloudName points to a partikkel cloud preset, and duration sets the duration for this cloud preset during sequenced playback. There are two special cloud presets: “static” and “interpolate”. A static preset sets the automation on hold for the duration specified, and an interpolation preset interpolates from the current parameter settings (whatever state the partikkel cloud playback generator is in now) to the next specified partikkel cloud in the list. It should be noted that using an “interpolate” preset at the end of a cloud sequence does not make any sense, as there is not any next cloud preset to interpolate to.
Manual editing of the sequence in the cloud sequence list is possible by using the list controls at the top of the list (edit item, new item, delete item, move item up, move item down). The user is responsible for specifying valid cloud preset names when editing. Valid presets are the cloud preset files (*.clo) currently residing in the “/presets” directory under partikkelCloudDesigner (equals the contents of the cloud preset menu GUI control). The file extension should be omitted when typing in the cloud sequence list (e.g. typing “test” refers to the cloud preset “test.clo”).
File menu
The window’s file menu can be used for common operations like loading and saving files (cloud presets and cloud sequences). Keyboard shortcuts for the different file operations are displayed next to each item in the menu. The application can be quit by selecting “Exit” on the file menu, or by closing the Cloud Play Controls window.
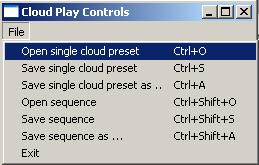
The Cloud Play Control window’s File menu
Cloud controls
The cloud preset controls GUI window
The cloud preset controls window contains detailed parameter settings for a cloud. You find the different parameter names in the column to the left, with breakpoint style (start-middle-end) curve automation values in the number boxes going from left to right. The rightmost part of the window describes random deviation from the values described in the leftmost part of the window.
Breakpoint segment curves
One row of parameters describes a breakpoint segment trajectory with two segments, and contains the following values:
|
Start |
The start value |
|
Time1 |
The time for the first segment (as a fraction of the cloud “Duration” as set in the Cloud Play Controls window). The parameters “Time1” and “Time2” are linked in such a way that their sum will always be 1.0. Editing one of these parameters will automatically update the other. |
|
Curve1 |
The curvature of the first segment, zero will give a straight line, positive values will give an increasingly convex curve, while negative values will give an increasingly concave curve. See also transeg in the Csound manual. |
|
Middle |
The middle value |
|
Time2 |
The time for the second segment (as a fraction of the cloud duration as set in the Cloud Play Controls window). See also description for Time1 |
|
Curve2 |
The curvature of the second segment. See also description for Curve1. |
|
End |
The end value. |
The Time1 and Time2 parameters are common for all parameter types (all lines), and because of this the time parameters only exist on the first line.
Random deviation parameters
The rightmost part of the window contains breakpoint segment parameters for random deviation (rdStart, rdTime1, rdCurve1 etc). The parameters act in the same way as described for segment trajectories above. The random deviation parameters act together with the “Turbulence” metaparameter in the Cloud Play Controls window, where “turbulence” scales all random deviation values (so a turbulence of zero will bypass all random deviation parameter settings).
There are two different mapping methods used for determining how random deviation should affect different parameter types; “multiply&add” mapping and “offset” mapping. The “multiply&add” mapping will use the formula: value+(value*random*deviation) where random is bipolar and deviation is the random deviation value as set in the GUI. The “offset” mapping will use the formula: value+(deviation*random), in this case random is positive only.
These parameters use the “multiply&add” random deviation mapping: Amp, GrRt (grain rate), sync, Trsp (transpose), sweepTo, Dur, Shape, Atck (Attack), FmFq (FM frequency), nFmFq (noise FM frequency), nFmDst (noise FM distribution).
These parameters use the “offset” random deviation mapping: SweepShape, gDist (grain distribution), FmIdx (FM index), nFmIdx (noise FM index), rMsk (random masking of grains), waveX (wave mix X axis), waveY (wave mix Y axis).
The parameter type chanMask: does not use random deviation.
Consider these examples:
For “multiply&add” mapping; The transpose value for partikkel voice 1 (“Trsp1”) is 2.0 (the waveform will be transposed up one octave). With a random deviation value of 0.5, the transposition value will vary between 1.0 and 3.0 (as the fomula: value+(value*random*deviation) translates into: 2.0+(2.0*(random in range +/-1.0)*0.5).
For “offset” mapping; Random masking value (“rMsk”) is 0.0. With a random deviation value of 0.5, the random mask value will vary between 0.0 and 0.5 (as the fomula: value +(deviation*random) translates into: 0.0+((random in range 0.0 to 1.0)*0.5).
Description of the different parameter types
The partikkel cloud player generating audio in this application consist of 4 instances of the partikkel opcode in Csound. Each instance generates a stream of audio grains. Some of the automation parameters are separate for each instance, while some parameters are set for all 4 instances.
|
Amp1 |
Amplitude for the first grain generator |
|
Amp2 |
Amplitude for the second grain generator |
|
Amp3 |
Amplitude for the third grain generator |
|
Amp4 |
Amplitude for the fourth grain generator |
|
Grain rate for the first grain generator |
|
|
GrRt2 |
Grain rate for the second grain generator |
|
GrRt3 |
Grain rate for the third grain generator |
|
GrRt4 |
Grain rate for the fourth grain generator |
|
sync |
Grain scheduler clock synchronization amount. See below for a detailed description. |
|
Grain transposition factor for the first grain generator |
|
|
Trsp2 |
Grain transposition factor for the second grain generator |
|
Trsp3 |
Grain transposition factor for the third grain generator |
|
Trsp4 |
Grain transposition factor for the fourth grain generator |
|
sweepTo |
Pitch sweep destination factor for pitch sweeps within grains, e.g. a value of 2.0 will sweep to a pitch one octave up from the starting pitch transposition. |
|
SweepShape |
Pitch sweep shape. Range 0.0 to 1.0. Examples: If set to 0.0, the pitch will stay long at the starting value and sweep quickly towards the end of the grain. If set to 0.5, a linear sweep will be used. If set to 1.0, the pitch will sweep quickly to the destination value and stay there for the rest of the grain duration. |
|
Grain duration for the first grain generator |
|
|
Dur2 |
Grain duration for the second grain generator |
|
Dur3 |
Grain duration for the third grain generator |
|
Dur4 |
Grain duration for the fourth grain generator |
|
Shape |
Amplitude envelope shape for each grain. Range 0.0 to 1.0. Examples: If set to 0.0, no enveloping will be used for each grain (equals a square envelope) If set to 1.0, a sigmoid ramp shape is used for the attack and decay portions of each grain, the attack and decay time each spanning 50% of the grain duration, effectively enveloping the whole grain. If set to 0.5, the same sigmoid ramp shape is used for the attack and decay portions of each grain, but the attack and decay time each spanning 25% of the grain duration, leaving the middle 50% of the grain at full amplitude. |
|
Atck |
Grain attack/decay time balance. Range 0.0 to 1.0. Works in conjunction with the Shape parameter. Examples: If set to 0.0, the attack time will be 0% and the decay time will be 100% of the enveloped time as set by the Shape parameter. If set to 0.5, the attack and decay times each will span 50% of the enveloped time as set by the Shape parameter. |
|
Grain distribution. Range 0.0 to 1.0. Random time displacement of individual grains. If set to 1.0, grains may be time displaced by 1/Grain rate seconds. |
|
|
FmFq |
Modulator frequency for a sine wave modulator oscillator, for frequency modulation of the waveform inside each grain. |
|
FmIdx |
Master modulation index for both modulators (sine and noise), for frequency modulation of the waveform inside each grain. |
|
nFmFq |
Modulation frequency for a noise generator, for frequency modulation of the waveform inside each grain. |
|
nFmIdx |
Modulation index for a noise generator, for frequency modulation of the waveform inside each grain. |
|
nFmDst |
Noise distribution for the FM noise generator. For a detailed description, see the krpow parameter to the rnd31 opcode in the Csound manual. |
|
Random masking of individual grains. Range 0.0 to 1.0. If set to 0.0, all grains will be played. If set to 1.0 no grains will be played. |
|
|
waveX |
X axis value for mix of the 4 source waveforms. See below for a detailed description. |
|
waveY |
Y axis value for mix of the 4 source waveforms. See below for a detailed description. |
|
tLfoFq |
Time pointer modulation frequency. A low frequency oscillator (triangle waveform) can be used to modulate the timePos parameter (see below). The tLfoFq parameter sets the frequency of such modulation. |
|
tLfoAmt |
Time pointer modulation amount. Range 0.0 to 1.0. A low frequency oscillator (triangle waveform) can be used to modulate the timePos parameter (see below). The tLfoAmt parameter sets the amount of such modulation. |
|
Time pointer, determining the read start position for source waveforms. Range 0.0 to 1.0. If set to 0.0, the source waveforms are read starting at the beginning. If set to 0.5, the source waveforms will be read starting in the middle of the sound. |
|
|
chnMask |
Channel masking table data. Format [loostart, loopend, data_1, data_2 …. data_n]. See below for detailed description |
sync:
Each of the four partikkel opcode instances have separate grain scheduler clocks, so for example one instance can create 4 grains per second while another creates 5 grains per second. The sync parameter is used to synchronize the grain scheduler clocks, creating soft or hard sync. This can be used to synthesize a sound where scattered grains converge on a common pulse. Partikkel instance 1 is the master clock to which the other instances will try to synchronize. To achieve hard sync, instance 1 needs to have the highest grain rate of the four partikkel instances. The following technical explanation may help in understanding the sync feature: Each clock works by means of an internal incrementor, creating a linear ramp from 0.0 to 1.0. When the ramp reaches 1.0, a grain is generated and the ramp value reset to 0.0. Whenever a grain is generated, a sync trigger signal is output from each partikkel instance. This trigger signal is used to increment or decrement the internal phase of the other partikkel generators (excepting instance 1, because it’s used as the master clock). The amount of phase increment or decrement is determined by the sync parameter value. The sync polarity (increment or decrement) is determined by the current phase value of the clock to be synchronized. If the internal phase of the clock is less than 0.5, it will be decremented, if it is larger than (or equal) to 0.5, it will be incremented. When using a sync value of 0.1, the slave clock will only be nudged toward a synchronized state, but when using a sync value of 1.0 the slave clock will be reset immediately and a grain will be generated.
Wave mix:
The partikkel opcode uses 4 source waveforms to synthesize the waveform used inside each grain.
Selection of waveforms can be done with the waveform menu controls in the Cloud Play Controls window.
For the purpose of this application, these four waveforms can be mixed by means of a (imagined) two-dimensional “XY pad”.
Maximum amplitude for each waveform “resides” in each corner of this XY pad (se figure).
For example: The maximum amplitude for waveform 1 is set by using the coordinates x=0, y=0, maximum amplitude for waveform 2 by using the coordinates x=1.0, y=0.0. An equal mix of all four waveforms can be set by using coordinates x=0.5, y=0.5.
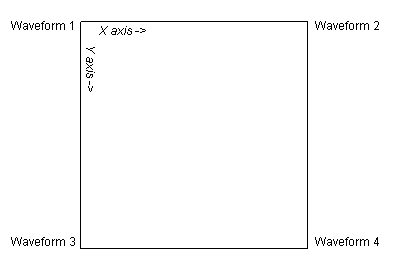
The (imagined) two dimensional XY pad for waveform mixing
Channel masking:
The partikkel opcode can output audio grains using up to 8 separate outputs. For this application, 4 outputs have been used. Output 1 (and 3) and 2 (and 4) can be routed to stereo out Left and Right respectively, output 3 can be routed to a delay effect, while output 4 can be routed to a reverb effect. The effective output routing can be modified with the Reverb, Delay and St.width control in the Cloud Play Controls window.
The partikkel opcode uses a sequence of number to determine which output a specific grain should be sent to. The output numbers are zero based, meaning that the number 0 will send the audio to output 1 and so on. For example, the sequence 0,1,2,3 will send the first grain generated to output 1, the next to output 2, the next to output 3, the next to output 4, and then the sequence starts over so the next grain will be sent to output 1.
To enable sequences of varying length, we also need to specify a start and end location (index into the number sequence). This is done with the two first numbers in the chanMask parameter controls, the rest of the numbers represent output channels as described above.
Examples:
[0,3,0,1,2,3] will create the sequence of output channels per grain as described above; The first grain is sent to output 1, the next to output 2, proceeding to output 3, output 4, and then starting over with output 1.
[0,6,0,1,2,3,2,0,3] will create this sequence of output channels per grain: The first grain is sent to output 1, the next to output 2, proceeding to output 3, output 4, output 3, output 1, output 4, and then the sequence starts over with output 1.
Note: The output channel values may be fractional, a value of 0.5 will send the grain with equal amplitude to outputs 1 and 2. Using values higher than the number of output channels will crash the application.Since the channel values are zero based, the highest number allowed is 3.99.